Safepal S1 Pro Manual
Package contents
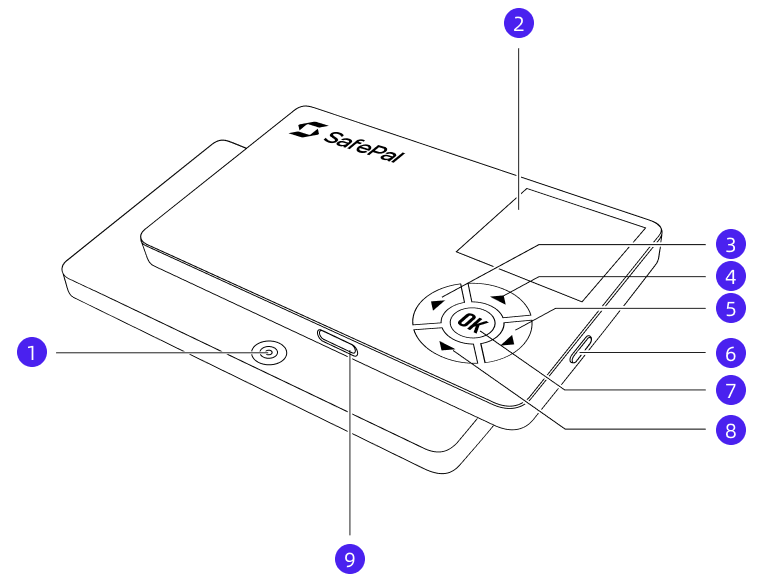
Structure & Buttons
- Camera 2. Screen 3. Left 4. Up 5. Right 6. Power 7. OK 8. Down 9. Charging Port
Quick start
Note: In the following instructions, “SafePal S1 Pro” refers to the “SafePal S1 Pro Hardware Wallet” and “App” refers to the “SafePal App”.
1. Download and set up the SafePal App
To use an S1 Pro Hardware Wallet, you need to pair it with the SafePal App. Download the SafePal App via this link or by scanning the included QR code.

After installing the app, follow this guide to complete the quick setup of the app.
2. Create/Restore a wallet on the device
Create a new wallet
The images below show the step-by-step process of creating a new wallet on the S1 Pro hardware device:
Recover my wallet
The images below show the step-by-step process of restoring an existing wallet on the S1 Pro hardware device:
3. Pair the SafePal S1 Pro device with the SafePal App
After setting up the SafePal App, you can choose to add a Software Wallet or a Hardware Wallet. In this case, choose 'Hardware Wallet'.
Read the instructions on the SafePal App and click 'Next'.
By entering your security password, you will see a QR code on the SafePal App. Open the S1 Pro hardware wallet, click 'Scan' on the device, then use the S1 Pro device to scan the QR code on the SafePal App, enter your PIN code and click the 'OK' button on the S1 Pro device to confirm the pairing process.
Click the 'Next' icon in the App and scan the dynamic codes displayed on the S1 Pro device with your SafePal App, the App can successfully connect to the S1 Pro device.
4. Start safe and easy transactions with SafePal!
Congratulations, you have completed all the basic settings!
You will see several main menus on the S1 Pro device, and their functions are as follows:
-
Scan:
When you tap on this scan menu, you can use your S1 Pro device to scan the QR codes you want.
-
Asset management:
When you click on this Asset Management menu, you can choose to display your crypto address to receive cryptocurrency, or browse the transaction history of any crypto stored in your S1 Pro device.
-
Signature Record:
When you click on this Signature Record menu, you can view any crypto transfer, authorization, or trading history on your S1 Pro device.
-
Institutions:
When you open the Settings menu, you can adjust various settings for your S1 Pro device:
①. Passphrase: Add a passphrase to secure your S1 Pro wallet.
②. Seed Verification: Verify the accuracy of your mnemonic phrase backup.
③. Sleep Time: Set the duration of inactivity before your S1 Pro device goes into sleep mode.
④. Auto-OFF: Specify the timeout period after which the screen of your S1 Pro device will automatically turn off.
⑤. Change PIN: Update the PIN code of your S1 Pro device.
⑥. Coin Management: Manage the cryptocurrencies stored in your S1 Pro device. You can add or remove coins as needed.
⑦. Languages: Choose your preferred language for the S1 Pro device.
⑧. Random PIN Keypad: Enable or disable random placement of the PIN keys.
⑨. Upgrade: Start an upgrade for your S1 Pro device.
⑩. Reset Wallet: Reset your S1 Pro wallet to the initial status.
⑪. Download App: Scan the provided QR code to download the SafePal App.
⑫. About: Access detailed information about your S1 Pro device, including the wallet name, wallet type, firmware version, serial number (SN) and activation time of your S1 Pro device, etc.
5. After completing the installation, pay attention to the usage warnings for your S1 Pro:
The SafePal S1 Pro is made of tempered glass panel and aluminum alloy, with a 500mAh battery.
The device should be operated within a temperature range of 0℃ to 55℃ (32℉ to 131℉) and stored within a temperature range of -20℃ to 60℃ (-4℉ to 140℉).
Charge the device with a 'DC 5V' mobile charger. DO NOT use a laptop charger as it may damage the device.
Do not use harsh chemical solvents for cleaning. Instead, clean the device with a damp paper towel or soft cloth.
To protect the environment, keep the appliance away from fire and do not throw it into the garbage.
Do not try to open, modify or repair the device by yourself. If the device does not work properly for unknown reasons, please contact us via the link channel here.